pSatellite (pS) is a satellite tracking application for the Palm OS® environment. It provides visualization of satellite orbit position on a world map (Mercator projection) from any ground location you enter within pS. The core vector propagator within pS uses standard Two Line Elements (TLE's) available on the Internet and works for both low earth orbiting (LEO's) and geo-synchronous (GEO's) satellites.
Install these three files on your Palm OS® handheld for pS to operate properly:
If you already have an older version of pS installed on your handheld just export your locations and delete the older version first.
Tap on the application to launch it. The program always starts up with the satellite tracking indicator On and the tracking step interval set per your preference (1 minute default). pS will always remember which satellite and tracking location you last selected, whenever it is launched again, to quickly return to your previous/last selection. Other operating features are discussed in detail below, and there are built in Help and Tips (I) within the various program windows.
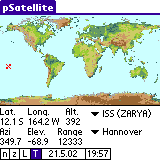
When you first launch the program you will see the Main display window.
The top half of the Main display has the world map and will show indicators (bitmaps) for the satellite and the (observers) tracking location.
The lower half of the Main display shows the pS computed values and allows various operator selections to me made.
NOTE: The demo version of pS is crippled in respect to allowing
the use of the Date and Time selection feature. The demo pS runs on the current
handheld time reference only. You may load other TLE sets into the demo version
of pS for evaluating its usefulness/accuracy and all other features of the
program. However, selecting other Dates and Time will not be possible (the
full registered pS version enables the Date/Time selection feature).
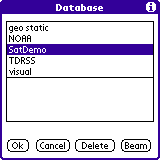
Several TLE sets (each set can contain many satellites) may be installed onto your handheld as desired. You might want to consider having different categories of satellite TLE sets using different file names (i.e., GEO, LEO, NOAA, NASA, etc). This would help minimize the number of satellites selectable at any one time on the pop-up menu within pS. pS has a limitation of reading no more that 300 TLEs within a set. See additional information below on Obtaining TLE Data. You may also select a database for deletion or beaming to another Palm OS® handheld.
NOTE: If you are a PocketSat user the same TLE sets that work with this Palm OS® application can also be shared/used by pS (the file structure/formats are the same).
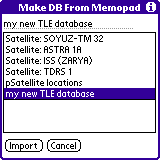
Copy and paste TLE data from various Web pages (see more info at end of this documentation) into your Palm™ Desktop software Memos and then HotSync for easy importing into pS. You may import a single TLE or multiple TLEs within the memo. The standard TLE format is used (Satellite name along with the two lines containing the elements). The imported Memo of TLEs must have a Title line as the first line of data to be importing properly. This Title line will become the suggested new Sat DB name upon import (or you may change its file name as desired). After successfully importing, the new DB will be automatically selected when returning to the Main display. You may also use the Load DB menu option and select any other databases you have imported into pS.
Sample:
----------------------------- cut here ------------------------------
my new TLE database
ISS (ZARYA)
1 25544U 98067A   01312.13140046  .00091733  00000-0  11002-2 0  7005
2 25544  51.6395  84.8192 0008428 297.4368  67.6034 15.60112444169543
----------------------------- cut here ------------------------------
Please notice: There is one start line and three lines for each TLE and no empty lines after it.
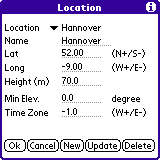
You may create New observer (site tracking) locations or edit (Update/Delete) existing locations as desired. pS allows up to 300 locations to be entered. Enter Name (limited character length for pop-up menu size purposes), Latitude, Longitude and Height (not that important if you don't know it exactly). The Min Elev determines your local horizon angle for satellite visibility. This essentially determines when Acquisition of Signal (AOS) and Loss of Signal (LOS) will occur as the satellite passes overhead.
pS Time Management - a few words are needed here to explain how pS manages the Time displayed on the Main display window. The TLE (Epoch) time is always referenced to UTC (Universal Time Coordinated) time, which is essentially the same as Greenwich Mean Time - GMT, or time at O degree Longitude that passes through England. The pS program internally uses UTC as its base time.
The Time Zone value (hours), which can be entered within the Location Window, will allow you to offset that particular locations' time (from the base pS UTC time) to show local time in the Main Window Time display. For example, if "5" is entered, this would be for USA Eastern Standard Time (EST), and a "0" entry would indicate UTC for that location. So each location entered within pS can have a different Time Zone offset value to display its local time on the main display.
If that’s not confusing enough, there is an option in Preferences to Show UTC for all the displayed times, which is what most steely eyed trackers commonly use. When this option is selected, and you have entered your handheld local time offset within the UTC Preference, the Main Window Time display will always be in UTC time no matter what observer (site) location you have selected. This Show UTC Preference essentially overrides all local time offsets that you entered within the Location Window Time Zone of each location. If you uncheck the Show UTC Preference, pS will use these Time Zone offset values that you have enter for each of the observer locations.
NOTE: pS does not alter your handheld time setting.

If you have several new observer locations to enter at one time, you may want to consider using this Memo importing capability. Whatever locations you import will be appended to the current location database that pS maintains (duplicate locations are not overwritten). Format of the imported location data (within the memo) is the same as what pS exports to a memo, which includes a Title on the first line. Enter a couple of locations within pS, then Export it to a Memo, and use that Memo as template for the proper formatting of the imported data. The semicolon " ; " character is used as the data field delineator for both importing and exporting of the Location data.
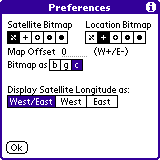
Bitmaps - You may have different Bitmap symbols for the indicator of the Satellite track and observer Location on the world map.
Map Offset (W+/E-) - The Map Offset allows different views of the world map. Enter any Longitudinal offset within +/-180 degrees to shift the map around. pS by default places the zero degree Longitude (Greenwich) point on the world map at the center of the display. Enter 180 to see what the Pacific view of the world would look like.
Bitmap as - The Map can be displayed in black/white ("b"), gray scale ("g"), or color ("c") depending on your handheld capability.
Display Satellite Longitude - You may display the Satellites longitude position in different Longitudinal coordinate references. West/East of the Greenwich 0 degree Longitude point (default), or in all West coordinates, or all East coordinates.
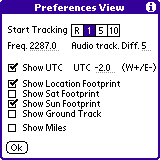
Start Tracking - At pS startup tracking will always be on. This selection allows you to set the default tracking interval (Real time, 1, 5, or 10 minutes) whenever the program starts up.
Freq - You may enter any desired tracking frequency (in MHz). The pS computation of the Doppler frequency is based on this entry.
Audio track Diff. - this is a value used for the antenna view window when audio output is switched on. It tells how wide is the angle (in degrees) before you get an new audio output.
Show UTC - this checkbox enables or disables the local Time Zone offsets that you have entered for your various Locations. When checked shows all times on the main display in UTC no matter what location is selected. (See additional information in pS Time Management above).
UTC (W+/E-) - this preference should have your local handheld time offset from UTC entered. This is very important (mandatory) to have this UTC offset entered in order to anchor (synchronize) the pS program time to your local handheld time (after all pS needs to know where your handheld is in the world). If you do not enter this offset value the pS Time Zone and Show UTC features won't work properly for displaying the time and/or satellite position. If "0" is entered this would indicate your local time is UTC. (See additional information in pS Time Management above).
pS has a new feature for the handling internal time. It works together with the Daylight Savings Time 'DST panel' from Remo Hofer available at http://www.geocities.com/SiliconValley/Cable/5206/. This nice piece of software knows the start and end dates of DST in your local area and can automatically set the PDA time. pS knows when this program is present and the pS time offset in Preferences doesn't need to be changed when DST occurs. This panel will tell you 'DST is on'. This is not needed when PalmOS® 4 is present.
Show Loc(action) Footprint - pS will draw on the Main display a coverage (visibility) footprint around the currently selected location. This footprint is based on the location minimum elevation angle and the altitude of the currently selected satellite.
Show Sat Footprint - pS will draw on the Main display a coverage (visibility) footprint about the satellite as it moves in its tracking orbit. The footprint is based on satellites altitude above mean sea level. This is redrawn each time the satellite position is updated which has a tendency to slow the program execution/update rate.
Show Sun Footprint - A day and night overlay is shown on the map.
Show Ground Track - A little track forward and backward on the satellite way is shown.
!!! These last three features will cost your pda a lot of power. E.g. moving the map in zoom mode or getting the menu will take a while when all features are selected.
Show Miles - When selected will show all distance values computed by pS in miles vice kilometers.
There is a limitation of 12 hours when looking ahead for the next AOS/LOS times. If no visibility occurs within the next 12 hours pS will resume where in previously stopped and continue tracking, however, no times will be displayed in the lower right corner. Because of the 12 hour cutoff time, it is possible that the displayed LOS time could be the correct LOS time or the actual 12 hour cutoff time itself, which ever occurs first. Once the next AOS/LOS times have went by (expired) you can then reselect Next AOS from the Track menu again to determine the next visibility period. This feature works in both the pS real time and fast time tracking modes.
The View menu allows selection of various tracking data information to be displayed on the bottom portion of the screen (second line). The label on the display will identify what is currently selected. This label may also be tapped to rotate through the available data values.

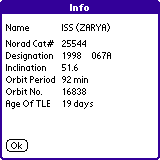
As for any State Vector Propagator, to obtain good satellite prediction information, you will need to obtain current TLEs (Epoch time-wise). The pS input format used must be the standard TLE format. You must install the TLE files (sets) into your handheld for pS to use (Options Menu -Load DB). There are several ways to do this (other than mentioned above in Make Sat DB), but will take some extra work to set yourself up to obtain the latest TLE data via the Internet.
Riley J. Elwood at NASA Goddard Space Flight Center for his beta testing
for tracking accuracy, features suggestions, and helping with the documentation.
A. Fischer, afischer (at) dbServ.de